Your browser doesn't support JavaScript api Archives - Page 2 of 3 - Windows Programming

Creating Custom Controls

A custom control is any standard Windows control with additional functionality added to the existing predefined class. Since all windows belonging to the same class use the same default window procedure adding a new windows procedure allows the developer to amend the controls behaviour.

Subclassing

Subclassing the control window classes (buttons, edit boxes, list boxes, combo boxes, static controls, and scrollbars) allows an application to intercept and act on messages before a window has processed them. This allows an application to monitor and modify a window’s behaviour. An application subclasses a window by replacing the address of the window’s original window procedure with the address of a new window procedure called the subclass procedure.

Win32 offers two types of subclassing: instance and global. With an instance subclass, only a single instance of the windows procedure is subclassed. In global subclassing, an application replaces the address of the Windows procedure in the WNDCLASS structure of a window class. All subsequent windows created with that class will then have the address of the subclass procedure.

Instance Subclassing

To subclass an instance of a window, call the API function SetWindowLong() (now superseded by SetWindowLongPtr for 64-bit compatibility) and specify the handle of the window to subclass together with the name of the new procedure. Use of the instance subclass means that only messages related to a specific window instance will be sent to the new window procedure making it suited to a situation where only a single control needs to be adjusted.

The prototype of the SetWindowLong function is –

LONG SetWindowLong( HWND hWnd, int nIndex, LONG dwNewLong); LONG_PTR SetWindowLongPtr(HWND hWnd,int nIndex,LONG_PTR dwNewLong);

Where
hWnd – Handle to the window.
hIndex – Specifies the zero-based offset to the value to be set.
dwNewLong – Specifies the replacement value.

If the function succeeds, the return value is the previous value of the specified offset.
If the function fails, the return value is zero.

Example

In the example below the command button is subclassed. When the button is clicked the application generates a beep


Global Subclassing

To create a global Windows subclass call the API function SetClassLong() (now superseded by SetClassLongPtr for 64-bit compatibility). Typically a hidden window of the control class is used to make the global subclass. All windows using that Windows class will be created with the new process address. Global subclassing is better suited to situations where several controls must be adjusted. Any globally subclassed control class will need to remove and then replace the replacement subclass with the original before program termination. This can be done before the application closes by calling SetClassLong with the address of the original procedure as a parameter.

The prototype for the function SetClassLong is

DWORD SetClassLong(HWND hWnd, int  nIndex,LONG dwNewLong); ULONG_PTR SetClassLongPtrA(HWND hWnd,int nIndex,LONG_PTR dwNewLong);

where
hWnd – A handle to the window.
nIndex – The value to be replaced. Specify one of the following values.
GCL_CBCLSEXTRA – Sets the size, in bytes, of the extra memory associated with the class. Setting this value does not change the number of extra bytes already allocated.
GCL_CBWNDEXTRA – Sets the size, in bytes, of the extra window memory associated with each window in the class. Setting this value does not change the number of extra bytes already allocated. For information on how to access this memory, see SetWindowLong.
GCL – Replaces a handle to the background brush associated with the class.
GCL_HCURSOR – Replaces a handle to the cursor associated with the class.
GCL_HICON – Replaces a handle to the icon associated with the class.
GCL_HICONSM – Replace a handle to the small icon associated with the class.
GCL_HMODULE – Replaces a handle to the module that registered the class.
GCL_MENUNAME – Replaces the address of the menu name string. The string identifies the menu resource associated with the class.
GCL_STYLE – Replaces the window-class style bits.
GCL_WNDPROC – Replaces the address of the window procedure associated with the class.
DwNewLong – The replacement value.
If the function succeeds, the return value is the previous value of the specified 32-bit integer  If the function fails, the return value is zero.

Example

The following short program demonstrates a global subclass on a button control. When the button is clicked the application generates a beep


Superclassing

Superclassing means creating a new class based on the behaviour of an existing class. A superclass has its own window procedure. The superclass procedure can then act on the message before returning it to the original window procedure. To superclass, an existing class use the GetClassInfo() function (now superseded by GetClassInfoEx for 64-bit compatibility) to obtain the existing WNDCLASS structure and then modify its behaviour to point to the new class. The prototype for the GetClassInfo API function is

BOOL GetClassInfo(HINSTANCE hInstance,LPCSTR lpClassName,LPWNDCLASSA lpWndClass); BOOL GetClassInfoExA(HINSTANCE hInstance,LPCSTR lpszClass,LPWNDCLASSEXA lpwcx);

where
HInstance – a handle to the application instance that created the class.
LpClassName – the preregistered class class name.
LpWndClass – A pointer to a WNDCLASS structure that receives the information about the class

If the function finds a matching class and successfully copies the data, the return value is nonzero.  If the function fails, the return value is zero.

Example

The following short program subclasses two buttons. The first uses a superclassed procedure and generates a beep. The 2nd button uses the standard Windows procedure to generate an exclamation.

Timers

Timers are used to schedule a periodic event and execute some program code.  The SetTimer() API function creates a timer and sets its parameters. Once a timer is created, it will generate timer events until the timer is terminated or the application exits. The prototype of this function is

UINT_PTR SetTimer(HWND hWnd,UINT  ID,UINT uElapse,TIMERPROC lpTimerFunc);

hWnd – a handle to the window to be associated with the timer..
iD – specifies an id value associated with the timer.
uElapse – Sets the time between interrupts in milliseconds.
lpTimerFunc – If lpTimerFunc is NULL, the system posts a WM_TIMER message to the application queue. If a function is specified the system directly calls an application-defined TIMERPROC callback function for each timer event.

If the function succeeds, the return value is an integer identifying the new timer. If the function fails to create a timer, the return value is zero

The SetTimer function also allows a timer’s parameters to be amended. Both the window handle and the timer identifier must be specified when modifying an existing timer. SetTimer can also change a message-based timer into a callback timer. To terminate a timer use the KillTimer() function. The prototype is

BOOL KillTimer(HWND hWnd,UINT_PTR uIDEvent);

Where
HWnd is a handle to the window associated with the specified timer.
UINT_PTR is the identifier of the timer to be destroyed.

If the function succeeds, the return value is nonzero. If the function fails, the return value is zero.

Example

The following short program creates a digital clock using the timer function to update the display

File Management API Functions

The Win32 API offers a set of functions for accessing and managing disk files. This is in addition to the I/O functions available as part of the C and C++ runtime libraries. A selection of these API functions is outlined below.

For further reading on the full list of file management functions 

https://docs.microsoft.com/en-us/windows/win32/fileio/file-management-functions

Creating and Opening Files

All types of files can be created and opened with the API function CreateFile(). Windows assigns a file handle to each file that is opened or created. This handle is then used to access that file. File handles are valid until closed with the CloseHandle() function, which closes the file and flushes the buffers. The prototype of this function is

HANDLE CreateFile(LPCSTR lpFileName,DWORD dwAccess,DWORD dwShareMode,LPSECURITY_ATTRIBUTES lpSecurityAttributes,DWORD dwCreationDisposition,DWORD dwFlagsAndAttributes,HANDLE hTemplateFile);

Where
lpFileName – The name of the file or device to be created or opened with a backslash (\) to separate the components of a path.
dwAccess – The requested access to the file or device, which can be summarized as read, write, both or neither
dwShareMode – read, write, both, delete, all of these, or none.
lpSecurityAttributes – determines whether the child processes can be inherited the returned handle. This parameter can be NULL.
dwCreationDisposition – An action to take on a file or device that exists or does not exist.
dwFlagsAndAttributes – file or device attributes and flag
hTemplateFile – handle to a template file that supplies file attributes and extended attributes for the file that is being created. This parameter can be NULL.

If the function succeeds, the return value is an open handle to the specified file. If the function fails, the return value is INVALID_HANDLE_VALUE

Reading From and Writing to a File

When a file is first opened, Windows places a file pointer at the start of the file. Windows then advances the file pointer after the next read or write operation. An application can also move the file pointer position with the SetFilePointer() function. An application performs read and write operations with the ReadFile() and WriteFile() API functions. The prototype of these functions are –

BOOL ReadFile(HANDLE hFile,LPVOID lpBuffer,DWORD nNumberOfBytes,LPDWORD lpNumberOfBytes,LPOVERLAPPED lpOverlapped);

BOOL WriteFile(HANDLE hFile, LPCVOID lpBuffer, DWORD nNumberOfBytes, LPDWORD lpNumberOfBytes, LPOVERLAPPED lpOverlapped );

Where
hFile – A handle to the device
lpBuffer – A pointer to the buffer that holds the data to be read or written.
nNumberOfBytes – The maximum number of bytes to be read or written.
lpNumberOfBytes – Number of bytes read or written when using a synchronous hFile parameter. 
lpOverlapped – A pointer to an OVERLAPPED structure.

If the function succeeds, the return value is nonzero.  If the function fails the return value is zero.

When the file pointer reaches the end of the file any attempts to read any further data will return an error.

Windows allows more than one application to open a file and write to it. To prevent two applications from trying to write to the same file simultaneously, an application can lock the shared file area with the LockFile() function (see below). Locking part of a file prevents other processes from reading or writing anywhere in the specified area. When the application has completed its file operations it can unlock that region of the file using the UnlockFile() function. All locked regions of a file should be unlocked before closing a file.

The code section below demonstrates the API functions ReadFile() and WriteFile() by creating and then writing to a simple text file and then reading the contents before displaying them in a messagebox

#include <windows.h>
int APIENTRY WinMain( HINSTANCE hInst, HINSTANCE hPrev, LPSTR lpCmdLine, int nCmdShow )
{
 HANDLE hFile;
// create the file.
hFile = CreateFile( TEXT("FILE1.TXT"), GENERIC_READ | GENERIC_WRITE,FILE_SHARE_READ, NULL, OPEN_ALWAYS,FILE_ATTRIBUTE_NORMAL, NULL );
if ( hFile != INVALID_HANDLE_VALUE )
{
DWORD dwByteCount;
TCHAR szBuf[64]=TEXT("/0");
// Write a simple string to hfile.
WriteFile( hFile, "This is a simple message", 25, &dwByteCount, NULL );
// Set the file pointer back to the beginning of the file.
SetFilePointer( hFile, 0, 0, FILE_BEGIN );
// Read the string back from the file.
ReadFile( hFile, szBuf, 128, &dwByteCount, NULL );
// Null terminate the string.
szBuf[dwByteCount] = 0;
// Close the file.
CloseHandle( hFile );
//output message with string if successful
 MessageBox( NULL, TEXT("File created"), TEXT(""), MB_OK );
}
else
{
//output message if unsuccessful
 MessageBox( NULL, TEXT("File not created"), TEXT(""), MB_OK );
}
 return 0;
}

CopyFile

Copies an existing file to a new file but not the security attributes. The prototype of the copyfile() API function is

BOOL CopyFile(LPCTSTR lpExistingFileName,LPCTSTR lpNewFileName,BOOL bFailIfExists);

Where
lpExistingFileName – The name of an existing file.
lpNewFileName – The name of the new file.
bFailIfExists – If this parameter is TRUE and the new file already exists the function fails. If this parameter is FALSE and the new file already exists, the function overwrites the existing file and returns true.

If the function succeeds, the return value is nonzero. If the function fails, the return value is zero.

CreateDirectory

Creates a new directory. The function applies a specified security descriptor to the new directory if the underlying file system is NTFS or one that supports security on files and directories. The prototype of this function is

BOOL CreateDirectory(LPCSTR lpPathName,LPSECURITY_ATTRIBUTES lpSecurityAttributes);

lpPathName – The path of the directory to be created
lpSecurityAttributes – A pointer to a SECURITY_ATTRIBUTES structure

Returns TRUE if successful; otherwise, the return value is FALSE.

DeleteFile

Deletes an existing file. If an application attempts to delete an open file or a file that does not exist, the function fails. The prototype of this function is

BOOL DeleteFile(LPCSTR lpFileName);

Where LpFileName is the name of the file to be deleted.  If the function succeeds, the return value is nonzero. If the function fails, the return value is zero (0).

GetFileAttributes

Retrieves file system attributes for a specified file or directory. The prototype of this function is

DWORD GetFileAttributes(LPCSTR lpFileName);

Where lpFileName is the name of the file or directory.  If the function succeeds, the return value contains the attributes of the specified file or directory. If the function fails, the return value is INVALID_FILE_ATTRIBUTES.

MoveFile

Moves an existing file or a directory to a new location on a volume. MoveFile will fail on directory moves when the destination is on a different volume. The prototype for this function is

BOOL MoveFile(LPCTSTR lpExistingFileName,LPCTSTR lpNewFileName);

LpExistingFileName – The name of the file or directory on the local computer.
LpNewFileName – The new name for the file or directory.

If the function succeeds, the return value is nonzero. If the function fails, the return value is zero.

RemoveDirectory.

Deletes the specified empty directory. The prototype of this function is

BOOL RemoveDirectory( LPCTSTR lpszDir );

Where lpszDir is a pointer to a null-terminated string that contains the path of the directory to be removed. The directory must be empty and the calling process must have delete access to the directory.  Returns true if successful; otherwise, the return value is FALSE. 

LockFile

Locks a region in an open file. The prototype for this function is

BOOL LockFile(HANDLE hFile,DWORD dwFileOffsetLow,DWORD dwFileOffsetHigh,DWORD nNumberOfBytesToLockLow,DWORD nNumberOfBytesToLockHigh);

where
hFile – A handle to the file.
dwFileOffsetLow – The low-order 32 bits of the starting byte offset in the file where the lock should begin.
dwFileOffsetHigh – The high-order 32 bits of the starting byte offset in the file where the lock should begin.
nNumberOfBytesToLockLow– The low-order 32 bits of the length of the byte range to be locked.
nNumberOfBytesToLockHigh -The high-order 32 bits of the length of the byte range to be locked.

If the function succeeds, the return value is nonzero (TRUE). If the function fails, the return value is zero (FALSE). 

UnlockFile

Unlocks a region in an open file

BOOL UnlockFile(HANDLE hFile,DWORD dwFileOffsetLow,DWORD dwFileOffsetHigh,DWORD nNumberOfBytesToUnlockLow,DWORD nNumberOfBytesToUnlockHigh);

where
hFile – A handle to the file that contains a region locked with LockFile.
dwFileOffsetLow – The low-order word of the starting byte offset in the file where the locked region begins.
dwFileOffsetHigh – The high-order word of the starting byte offset in the file where the locked region begins.
nNumberOfBytesToUnlockLow – The low-order word of the length of the byte range to be unlocked.
nNumberOfBytesToUnlockHigh – The high-order word of the length of the byte range to be unlocked.

If the function succeeds, the return value is nonzero. – If the function fails, the return value is zero.

Creating a Toolbar

Toolbars can be created using the CreateWindowEx function, specifying TOOLBARCLASSNAME as the window class name, or by using the depreciated API CreateToolbarEx function. A TBBUTTON structure contains information about the individual buttons and this is added to the toolbar via the sendmessage() function using the TB_ADDBUTTONS or TB_INSERTBUTTON message parameters. A bitmap is used to hold the toolbar image. Each time a button is clicked a WM command message will be generated with the ID of each button being held in the low order word of the wparam.

In the following example, a simple 3-button toolbar is defined and created with two standard buttons divided by a separator. A separator provides a small gap between button groups and does not receive user input. The API function LoadImage loads the toolbar bitmap from the local c drive into a handle of type HBITMAP. The toolbar image bitmap is then created by a call to the function ImageList_Create() and the imagelist is then added to the toolbar control by the function ImageList_Add(). The individual image associated with the toolbar button is set in the TBBUTTON structure.  Clicking either of these buttons will generate a message box indicating the button clicked

For in-depth reading on the creation of toolbars
https://docs.microsoft.com/en-us/windows/win32/controls/toolbar-control-reference

The following short program creates a simple toolbar with two buttons using the following two images. Clicking either button will produce a message box.

Bitmaps

Windows supports two types of bitmap: device-independent (DIB) and device-dependent(DDB). A device-independent bitmap is an external format, which allows bitmaps to be moved from one device to another. Device-dependent bitmaps are designed and optimised for use with a specific device (device-dependent) and hence are unsuitable for use in an environment for which they were not created. A typical example would be a bitmap created for video memory optimised for displaying screen output.

Creating and Loading Device-Independent Bitmaps

Device-independent bitmaps are typically created using an image editor. To load a bitmap for use in an application use the LoadImage() function. This supersedes the LoadBitmap() function. The prototype for this function is

HANDLE LoadImage(HINSTANCE hInst, LPCSTR name, UINT type, int cx, int cy, UINT fuLoad);

Where
hInst – is a handle to the module of either a DLL or executable (.exe) that contains the image to be loaded.
name – the image to be loaded.
UINT – The type of image to be loaded.
cx – The width, in pixels, of the icon or cursor.
cy– The height, in pixels, of the icon or cursor.
fuLoad – can be one of the following values: LR_CREATEDIBSECTION; LR_DEFAULTCOLOR;LR_DEFAULTSIZE; LR_LOADFROMFILE; LR_LOADMAP3DCOLORS; LR_LOADTRANSPARENT; LR_MONOCHROME; LR_SHARED; LR_VGACOLOR

If the function succeeds, the return value is the handle of the newly loaded image. If the function fails, the return value is NULL.

For further reading
https://docs.microsoft.com/en-us/windows/win32/api/winuser/nf-winuser-loadimagea

To convert a DIB to a DDB, use the API function CreateDIBitmap. 
https://docs.microsoft.com/en-us/windows/win32/api/wingdi/nf-wingdi-createdibitmap

Displaying Bitmaps

To display a bitmap, two device contexts must be declared: one will hold the current device context while the other will create a second copy device context that will be used to store the bitmap until it is ready to be drawn in the window. This copy device context is created using a call to API function CreatCompatibleDC().   A newly created or existing bitmap can then be selected into the copy device context using the SelectObject() API function and finally copied to the screen using the BitBlt() API function. The sequence of events is as follows –

DC=GetDC(hwnd);
memDC=CreateCompatibleDC(DC);
SelectObject(memDC,bitmap1);
BitBlt(DC,x.y,cx,cy, memdc,x1,y1,SRCCOPY);

The syntax for the CreateCompatibleDC function is

HDC CreateCompatibleDC(HDC hdc);

Where hdc is a handle to an existing DC. If this handle is NULL, the function creates a memory DC compatible with the application’s current screen. If the function succeeds, the return value is the handle to a memory DC. If the function fails, the return value is NULL.

The syntax for this Bitblt() copy function is

BOOL BitBlt(HDC hdc,int x,int y,int cx, int cy,HDC hdcSrc,int x1,int y1,DWORD rop);

where
hdc – handle to the destination device context.
x – The x-coordinate upper-left corner of the destination rectangle.
y – The y-coordinate of the upper-left corner of the destination rectangle.
cx – The width of the source and destination rectangles.
cy – The height, in logical units, of the source and the destination rectangles.
HdcSrc – A handle to the source device context.
x1 – The x-coordinate of the upper-left corner of the source rectangle.
y1 – The y-coordinate of the upper-left corner of the source rectangle.
rop – A raster-operation code. Define how the colour data for the source rectangle will be combined with the destination rectangle. The ‘vanilla’ operating code SRCCOPY will copy the source rectangle directly onto the destination rectangle. For additional raster code information see the link below

Bltbmp returns zero if successful and non-zero otherwise.

When a bitmap is no longer needed it must be destroyed using the DeleteObject() API function.

For further information 
https://docs.microsoft.com/en-us/windows/win32/api/wingdi/nf-wingdi-bitblt

Repainting the Screen Using Device Dependent Bitmaps

Using a bitmap to create a copy of the device context offers one solution to the problem of saving the contents of the client area before a repaint request. All screen output is directed to this virtual window and each time a repaint is received, the contents of the virtual window are then copied to the screen’s device context.

Creating Device-Dependent Bitmaps

The API function CreateCompatibleBitmap() creates a bitmap compatible with the current device context handle. This function is best used for creating colour bitmaps. The prototype of this API function is 

HBITMAP CreateCompatibleBitmap (hdc, cx, cy) ;

Where 
hdc is a handle to a device context
cx is the bitmap width, in pixels
cy is the bitmap height, in pixels. 

If the function succeeds, the return value is a handle to the compatible bitmap (DDB). If the function fails, the return value is NULL.

In addition, a Windows application can also create a device-dependent bit using the CreateBitmap API function. This function is best used for creating monochrome bitmaps. The syntax for this function is

HBITMAP CreateBitmap(int nWidth,int nHeight,UINT nPlanes,UINT nBitCount,const VOID *lpBits);

where
nWidth – The bitmap width, in pixels.
nHeight – The bitmap height, in pixels.
nPlanes – The number of colour planes used by the device.
nBitCount – The number of bits required to identify the colour of a single pixel.
lpBits – Set the colours in a rectangle of pixels. 

If the function succeeds, the return value is a handle to a bitmap. If the function fails, the return value is NULL.

Example

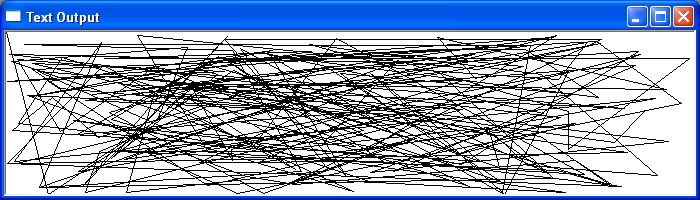
In the code section below, Windows creates a device context of the application window and a compatible device context. The application then creates and fills this virtual copy with 200 random lines. Each time a repaint request is received, the contents of the virtual window are copied to the screen device context by the BitBlt function.


Copying a Bitmap Using the StretchBlt Function

The StretchBlt() function copies a bitmap from a source rectangle into a destination rectangle, stretching or compressing the bitmap to fit the dimensions of the destination rectangle.  In the code section below Windows creates a bitmap of the existing screen display and then copies it to the application window using StretchBlt API function. Clicking the left mouse button anywhere with the client Window will initiate the screen copy action.

Example

In the code section below Windows creates a bitmap of the existing screen display and then copies it to the application window using StretchBlt API function. Clicking the left mouse button anywhere with the client Window will initiate the screen copy action.

#include <windows.h>
LRESULT CALLBACK WndProc(HWND, UINT, WPARAM, LPARAM);
int WINAPI wWinMain(HINSTANCE hInstance, HINSTANCE hPrevInstance,
 PWSTR lpCmdLine, int nCmdShow)
{
MSG msg ;
WNDCLASS wc = {0};
wc.style = CS_HREDRAW | CS_VREDRAW;
wc.lpszClassName = TEXT("Screen copy");
wc.hInstance = hInstance;
wc.hbrBackground = GetSysColorBrush(COLOR_BTNFACE);
wc.lpfnWndProc = WndProc;
wc.hCursor = LoadCursor(0, IDC_ARROW);
RegisterClass(&wc);
CreateWindow(wc.lpszClassName, TEXT("screen copy"),WS_OVERLAPPEDWINDOW | WS_VISIBLE,100, 100, 390, 350, NULL, NULL, hInstance, NULL);

while( GetMessage(&msg, NULL, 0, 0)) {
DispatchMessage(&msg);
}

return (int) msg.wParam;
}

LRESULT CALLBACK WndProc(HWND hwnd, UINT msg, 
 WPARAM wParam, LPARAM lParam)
{

static int maxX;
static int maxY;
HBITMAP hbit;

switch(msg)
{
case WM_LBUTTONDOWN:
maxX=GetSystemMetrics(SM_CXSCREEN);
maxY=GetSystemMetrics(SM_CYSCREEN);
int width;
int height;
HDC mhdc;
HDC hdc;
RECT rect;
;
if(GetWindowRect(hwnd, &rect))
{
width = rect.right - rect.left;
height = rect.bottom - rect.top;
}

mhdc = GetWindowDC(NULL);//creates a main windows device context
hdc=GetDC(hwnd);//creates application window device context
hbit=CreateCompatibleBitmap(mhdc,maxX,maxY);//create screen device context compatible bitmap
StretchBlt(hdc, 0, 0, width, height,mhdc,0,0,maxX,maxY,MERGECOPY);//copies main window bitmap to application screen
ReleaseDC(hwnd,mhdc);
ReleaseDC(hwnd,hdc);
break;
case WM_DESTROY:
PostQuitMessage(0);
return 0;
}
return DefWindowProc(hwnd, msg, wParam, lParam);
}

Common Dialog Box

The Common Dialog Box Library consists of a collection of functions for invoking standard dialog boxes for performing common tasks. There are standard Windows dialogs for opening and saving files, choosing a printer, finding and replacing text, setting font options, picking a colour, and using a help file. Using the common control dialog enables an application to maintain a look of consistency. The common dialog box library files are found in COMMDLG.H header file. To use these functions, the application must first initialise the fields of a structure and then pass a structure pointer to the function. When the user terminates the dialog box, control returns to the calling application with any relevant information passed back to the application via the dialog box structure.

For further reading https://docs.microsoft.com/en-us/windows/win32/dlgbox/dialog-box-types

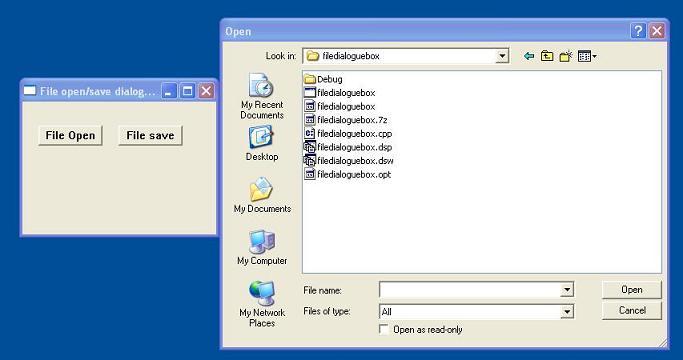
The examples below demonstrate 3 common dialog boxes: text find and replace, the file open and save and colour select. 


Select Colour Common Dialog Box

The Select Colour Dialog Box displays a basic set of available colours in addition to allowing a user to create custom colours by specifying RGB values


File Open/Save Common Dialog Box 

The ‘Common File-Open/Save’ dialog offers a consistent way to deal with file management operations, using the standard dialog interface that Windows users should be familiar with.

The Open dialog box lets the user specify the drive, directory, and the name of a file or set of files to open.

The Save As dialog box lets the user specify the drive, directory, and name of a file to save.


Find Common Dialog Box

The Find and Replace Common Dialog Box displays a modeless dialog box that allows the user to specify a string to search for within a text document, as well as additional options for text editing

The Dialog Box

A dialog box is a temporary popup window that prompts the user for additional information. A dialog box will usually contain one or more controls (child windows) with which the user can enter text, choose options, or direct the action of the application.

In addition to user-defined dialogue boxes, Windows also provides predefined dialog boxes that support common menu items such as colour selection and an open file interface.

Modal v Modeless Dialogue Box

Dialog boxes can be either modeless or modal. A modal dialogue box will not allow the user to switch between the dialog box and any other window without explicitly closing the dialog box. A modeless dialog box does not prevent the user from switching to other parts of the application.

Creating a Modeless Dialog Box

Modeless dialog boxes are created using the API function CreateDialog(). The syntax is below

hDlgModeless = CreateDialog (hInstance, lpTemplate, hWndParent, lpDialogFunc) ;

hInstance – A handle to the current application.
lpTemplate – specifies the resource identifier of the dialog box template.
hWndParent – A handle to the parent window that owns the dialog box.
lpDialogFunc – A pointer to the dialog box procedure.

Return value – If the function succeeds, the return value is the dialog box handle. If the function fails, the return value is NULL.

Deactivating a Modeless Dialog Box

To destroy the modeless dialog box, use the DestroyWindow() function.

BOOL DestroyWindow(HWND hWnd);

Where HWnd is a handle to the window to be destroyed.  If the function succeeds, the return value is nonzero. If the function fails, the return value is zero.

Creating a Modal Dialog Box

Modal dialog boxes are created using the APO function DialogBox(). The syntax is

void DialogBox(hInstance,lpTemplate,hWndParent,lpDialogFunc);

hInstance – A handle to the current application.
lpTemplate – Specifies the resource identifier of the dialog box template.
hWndParent – A handle to the parent window that owns the dialog box.
lpDialogFunc – A pointer to the dialog box procedure.

Deactivating a Modal Dialog Box

To deactivate and close a modal dialogue box use the EndDialog() API function call. The syntax of this function is

BOOL EndDialog(HWND hDlg,INT_PTR nResult);

HDlg – A handle to the dialog box to be destroyed.
nResult – The value to be returned to the application from the function that created the dialog box.

Return value – If the function succeeds, the return value is nonzero. If the function fails, the return value is zero.

Processing Dialog Messages

Each dialogue box will have its version of the window call-back function (wndproc) and receive messages in the same fashion as the main window. The dialog callback function, however, differs from its main Windows counterpart in that it returns a boolean value. 

Example

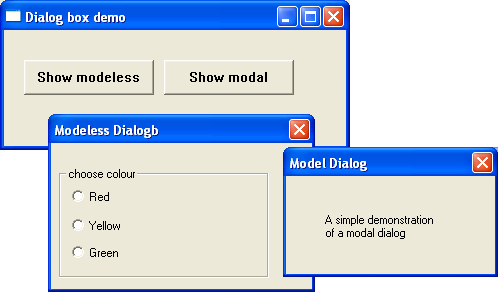
The code example demonstrates a modal and modeless dialog box. The modal dialog box displays a simple message. The modeless dialog box has 3 radio buttons. Selecting any of the radiobutton changes the background colour of the parent window.

dialog demo image

Dialog-Based Applications

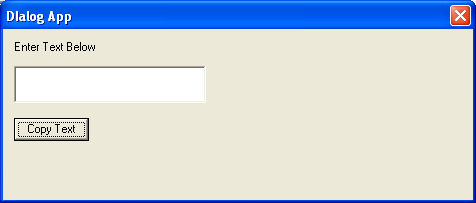
Creating a program where the main window is a dialog box is referred to as a dialog-based application. This method simplifies the application build process by making it easier to place controls onto the main window using the system resource dialog editor. A dialog box procedure can then be added to react to events that occur in the dialog box. Dialog-based applications are much simpler, architecturally, than other designs therefore dialog applications are best suited for creating rudimentary apps.

The following example creates a simple dialog-based application. The dialog box title can be changed to the value in the textbox by clicking the button control.


Displaying Graphics

Drawing Pixels

A pixel is the smallest image element that can be represented on screen. To draw a point within the client area of a window use the API function SetPixel(). The prototype for this function is

COLORREF SetPixel(HDC hdc,int x,int y,COLORREF color);

Where
hdc – the device context.
X – The x-coordinate, in logical units, of the point to be set.
Y – The y-coordinate, in logical units, of the point to be set.
Colour – is a COLORREF to paint the point. If the colour cannot be created on the video display, Windows will use the nearest pure non-dithered colour and then return that value from the function.

If the function is successful, the return value is the RGB colour. If the function fails, the return value is -1.

Drawing Lines

The LineTo() function draws a line within the client area from the current graphics drawing point. The prototype is

BOOL LineTo(HDC hdc, int x, int y);

where
hdc – the device context.
x – specifies the x-coordinate of the line’s ending point.
y – specifies the y-coordinate of the line’s ending point. 

If the function succeeds, the return value is nonzero. If the function fails, the return value is zero. The new starting point will then become the endpoint of the previous line.

MoveToEx

The initial starting position for graphics output will be the screen coordinate position 0,0 however this can be set by the application with a call to the API function MoveToEx(). The prototype for the MoveToEx function is –

BOOL MoveToEx(HDC hdc,int x,int y,LPPOINT lppt);

where
hdc – handle to a device context.
x – specifies the x-coordinate of the new position, in logical units.
y – specifies the y-coordinate of the new position, in logical units.
Lppt – is a pointer to a POINT structure that receives the previous current position.

If the function succeeds, the return value is nonzero. If the function fails, the return value is zero.

GetCurrentPosition

Retrieves the current logical graphics starting position.  The prototype of this function is

BOOL GetCurrentPositionEx(HDC hdc,LPPOINT lppt);

Where
hdc – handle to the device context
lppt – is a pointer to a POINT structure that receives the logical coordinates of the current position. 

If the function succeeds, the return value is nonzero. If the function fails, the return value is zero.

Drawing Rectangles

Rectangles are drawn with the currently selected pen and brush. To draw a rectangle, use the Rectangle() function. The prototype is

BOOL Rectangle(HDC hdc,int left,int top,int right,int bottom);

hdc – is a handle to the device context.
Left – is the x-coordinate of the upper-left corner of the rectangle.
Top – is the y-coordinate of the upper-left corner of the rectangle.
Right – the x-coordinate of the lower-right corner of the rectangle.
Bottom – the y-coordinate of the lower-right corner of the rectangle.
If the function succeeds, the return value is nonzero. If the function fails, the return value is zero.

To display rectangles with rounded corners using the API function RoundRect(). The prototype for this function is

BOOL RoundRect(HDC hdc, int left,int top,int right,int bottom,int width,int height);

where
hdc – A handle to the device context.
Left – The x-coordinate of the upper-left corner of the rectangle.
Top– The y-coordinate of the upper-left corner of the rectangle.
Right – The x-coordinate of the lower-right corner of the rectangle.
Bottom – The y-coordinate of the lower-right corner of the rectangle.
Width – The width, of the ellipse used to draw the rounded corners.
Height – The height of the ellipse used to draw the rounded corners.

If the function succeeds, the return value is nonzero.If the function fails, the return value is zero.

Drawing an Ellipse

To draw an ellipse or circle using the current pen and filled by the current brush, use the Ellipse() function. The prototype is –

BOOL Ellipse(HDC hdc,int left,int top,int right,int bottom);

where
hdc – A handle to the device context.
left – is the x-coordinate of the upper-left corner of the bounding rectangle.
Top – is the y-coordinate of the upper-left corner of the bounding rectangle.
Right – is the x-coordinate of the lower-right corner of the bounding rectangle.
Bottom – is the y-coordinate of the lower-right corner of the bounding rectangle.

If the function succeeds, the return value is nonzero.  If the function fails, the return value is zero.

To draw a circle the bounding rectangle must be a square. For example, to draw a circle that has a centre (50,50) with a radius of 10, use the following function parameters – Ellipse(hdc,10,10,50,50);

Drawing a Semi-Circular Wedge

To draw a semi-circular wedge using the current pen and fill it with the current brush, use the API function Pie(). The prototype of this function is

BOOL Pie(HDC hdc,int left,int top,int right,int bottom,int xr1,int yr1, int xr2,int yr2);

where
hdc – A handle to the device context.
Left – The x-coordinate of the upper-left corner of the bounding rectangle.
Top – The y-coordinate of the upper-left corner of the bounding rectangle.
Right – The x-coordinate of the lower-right corner of the bounding rectangle.
Bottom – The y-coordinate of the lower-right corner of the bounding rectangle.
xr1 – The x-coordinate of the endpoint of the first radial.
yr1 -The y-coordinate of the endpoint of the first radial.
xr2 – The x-coordinate of the endpoint of the second radial.
yr2 – The y-coordinate of the endpoint of the second radial.

If the function succeeds, the return value is nonzero. If the function fails, the return value is zero.

Drawing a Chord

To draw a Chord using the current pen and fill it using the current brush, use the API function Chord(). The prototype of this function is –

BOOL Chord( HDC hdc,int x1,int y1,int x2,int y2,int x3,int y3,int x4, int y4);

hdc – handle to the device context.
x1 – The x-coordinate of the upper-left corner of the bounding rectangle.
y1 – The y-coordinate of the upper-left corner of the bounding rectangle.
x2 – The x-coordinate of the lower-right corner of the bounding rectangle.
y2 – The y-coordinate of the lower-right corner of the bounding rectangle.
x3 – The x-coordinate of the endpoint of the radial defining the beginning of the chord.
y3 – The y-coordinate of the endpoint of the radial defining the beginning of the chord.
x4 – The x-coordinate of the endpoint of the radial defining the end of the chord.
y4 – The y-coordinate of the endpoint of the radial defining the end of the chord.

If the function succeeds, the return value is nonzero. If the function fails, the return value is zero

Drawing Polygons

The API function used to draw a polygon is Polygon(). The prototype of this function is

BOOL Polygon(HDC hdc,const POINT *apt,int cpt);

hdc – A handle to the device context.
apt – A pointer to an array of POINT structures that specify the vertices of the polygon
cpt – The number of vertices in the array. This value must be greater than or equal to 2.

If the function succeeds, the return value is nonzero.  If the function fails, the return value is zero.

Bézier Curves

The PolyBezier() function draws one or more Bézier curves. The prototype of this function is

BOOL PolyBezier(HDC hdc,const POINT *apt,DWORD cpt);

where
hdc – A handle to a device context.
apt – A pointer to an array of POINT structures that contain the endpoints and control points of the curve(s), in logical units.
cpt – The number of points in the lppt array. This value must be one more than three times the number of curves to be drawn.

If the function succeeds, the return value is nonzero.  If the function fails, the return value is zero.

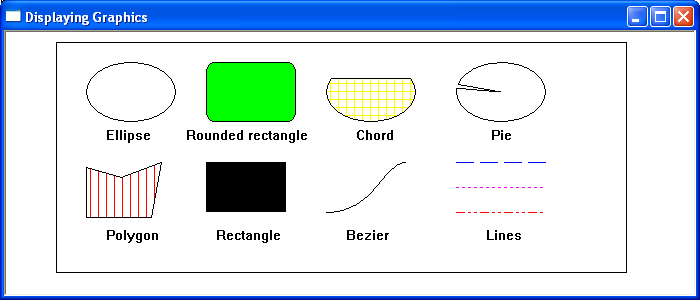
Example

The following code builds on the basic window to display Windows graphics

displaying graphics image

Displaying Text

Basic Text Output

Two popular text printing functions are TextOut() and DrawText().

The prototypes are as follows –

BOOL TextOut(HDC hdc, int x,int y,LPCSTR lpString,int slength);

where
hdc – A handle to the device context.
– horizontal location.
y – vertical location.
lpString – pointer to a character string.
slength – is the number of characters in the string to be displayed

If the function succeeds, the return value is nonzero. If the function fails, the return value is zero.

int DrawText( HDC hdc,LPCTSTR lpString,int nCount,LPRECT lpRect,UINT uFormat);

where
hdc – A handle to the device context.
lpString – A pointer to the string that specifies the text to be drawn. If the nCount parameter is -1, the string must be null-terminated.
nCount – The length, in characters, of the string
lpRect – A pointer to a RECT structure containing the rectangle (in logical coordinates) in which the text is formatted.
uFormat – The method of formatting the text.

If the function succeeds, the return value is the height of the text in logical units. If the function fails, the return value is zero

Creating Custom Fonts

In addition to a small variety of built-in fonts, Windows also allows the creation of custom-built fonts. To create a custom font use the CreateFont() win32 API function.  The syntax for the CreateFont function is

HFONT CreateFont(int cHeight,int cWidth,int cEscapement,int cOrientation,int cWeight,DWORD bItalic,DWORD bUnderline,DWORD bStrikeOut,DWORD iCharSet,DWORD iOutPrecision,DWORD iClipPrecision,DWORD iQuality,DWORD iPitchAndFamily,LPCSTR pszFaceName);

If successful the CreateFont returns a handle to the font created. If the function fails, the return value is NULL.  Any created font must be deleted before the application terminates. In order to delete the font use the DeleteObject() function.

For a more detailed explanation of font creation – https://docs.microsoft.com/en-us/windows/win32/gdi/font-creation-and-selection

Before any graphics object can be used it is ‘selected’ into the current device context (DC). The new object will then replace the previous graphic object of the same type.

Setting Text Background and Text Colour

The Windows API functions SetTextColor() and SetBkColorTo() are used to set the text and text background colour. The syntax for these two are

COLORREF SetTextColor(HDC hdc,COLORREF color); COLORREF SetBkColor(HDC hdc,COLORREF color);

Where hdc refers to the device context and colour is used to specify an RGB value.  If the function succeeds, the return value is a colour reference to the previous text colour.

TextMetrics

The textmetric structure describes the attributes of a given font and enables an application to work with text with different font attributes. The API function GetTextMetrics() is used to get information about the current font. The syntax of this function is –

BOOL GetTextMetrics(HDC hdc,LPTEXTMETRIC lptm);

Where hdc is a handle to the device context and lptm is a pointer to the TEXTMETRIC structure that receives the text metrics.

If the function succeeds, the return value is nonzero.  If the function fails, the return value is zero.

The textmetric structure is defined as follows –

TypeDef struct TEXTMETRIC{ tmHeight As Long //height of font tmAscent As Long //height above baseline tmDescent As Long //length of descender tmInternalLeading As Long //space above character tmExternalLeading As Long //blank space above rows tmAveCharWidth As Long //average width tmMaxCharWidth As Long //maximum width tmWeight As Long //weight tmOverhang As Long //extra width added to special font tmDigitizedAspectX As Long //horizontal aspect tmDigitizedAspectY As Long //vertical aspect tmFirstChar As Byte //first character in font tmLastChar As Byte //last character in font tmDefaultChar As Byte //dafault character tmBreakChar As Byte //character used to break words tmItalic As Byte //non zero if italic tmUnderlined As Byte //non zero if underlined tmStruckOut As Byte //non zeri is struckout tmPitchAndFamily As Byte //pitch and family of font tmCharSet As Byte //character set identifier }End Type

For more information 
https://docs.microsoft.com/en-gb/windows/win32/api/wingdi/ns-wingdi-textmetrica

Character Spacing and Creating Multi-line Text

Since the characters in a non-monospaced typeface will not occupy the same amount of horizontal space on a line, it will be necessary for an application to know the length of a string when outputting consecutive lines of text. As Windows does not keep track of the current output location an application will need to know where any previous text output ended. To provide this information the Windows API includes the function GetTextExtentPoint32(). The syntax of this function is

BOOL GetTextExtentPoint32(HDC hdc,LPCSTR lpString,int len,LPSIZE lpsize);

where
hdc – A handle to the device context.
lpString – holds the string used for the length calculation.
len – length of the string lpString.
lpsize – A pointer to a SIZE structure that returns the width or height of the string (see below)

If the function succeeds, the return value is nonzero.  If the function fails, the return value is zero.

The prototype for the size structure is

typedef struct tagSIZE {LONG cx;LONG cy;} SIZE;

Upon return, the CX field will contain the length of the string and the CY will contain the height of the string.

Example

The following short program demonstrates various stock and user-defined fonts and other aspects of font formatting

text output image

ScrollBar Control

Scrollbars differ from other controls by passing information to the parent windows by use of the WM_VSCROLL and WM_HSCROLL messages.

When processing these scroll bar messages, the value of the LOWORD (wparam) indicates what action the scrollbar has taken while the lParam parameter enables the application to identify the type of scroll bar. A value of zero indicates a windows scrollbar and any other value holds the handle of the scroll bar control.

The most common scrollbar messages are

SB_LINEUP – is sent when the scrollbar moves up one position
SB_LINEDOWN – is sent when the scrollbar moves down one position
SB_PAGEUP – is sent when the scrollbar is moved up one page
SB_PAGEDOWN – is sent when the scrollbar is moved down one page
SB_LINELEFT – is sent when the scrollbar is moved left one position
SB_LINERIGHT – is sent when the scrollbar is moved right one position
SB_PAGELEFT – is sent when the scrollbar is moved one page left
SB_PAGERIGHT – is sent when the scrollbar is moved one page right
SB_THUMBPOSITION – is sent after the thumbbar is dragged to a new position
SB_THUMBTRACK – is sent while the thumbbar is dragged to a new position

The following API functions can be used to get and set additional scrollbar information

GetScrollInfo() – retrieves the parameters of a scroll bar, including the minimum and maximum scrolling positions, the page size, and the position of the scroll box (thumb). The prototype of this function is

BOOL GetScrollInfo(HWND hwnd,int nBar,LPSCROLLINFO lpsi);

If the function does not retrieve any values, the return value is zero else the return value is non-zero.

SetScrollInfo() – the SetScrollInfo function sets the parameters of a scroll bar, including the minimum and maximum scrolling positions, the page size, and the position of the scroll box (thumb). The function also redraws the scroll bar, if requested.  The prototype of this function is

int SetScrollInfo(HWND hwnd,int nBar,LPCSCROLLINFO lpsi,BOOL redraw);

Where

hwnd – handle to a scroll bar control or a window with a standard scroll bar.
nBar – Specifies the type of scroll bar for which to retrieve parameters. This parameter can be one of the following values
   SB_CTL – Retrieves the parameters for a scroll bar control. 
   SB_HORZ – Retrieves the parameters for the window’s standard horizontal scroll bar.
   SB_VERT – Retrieves the parameters for the window’s standard vertical scroll bar.
lpsi – Pointer to a SCROLLINFO structure(see below).
redraw – Specifies whether the scroll bar is redrawn to reflect any changes. Only relevant when setting scrollbar values.

The return value is the current position of the scroll box. where the parameters

The SCROLLINFO structure contains scroll bar parameters to be set by the SetScrollInfo function or retrieved by the GetScrollInfo function

typedef struct tagSCROLLINFO {UINT cbSize;UINT fMask;int  nMin; int  nMax; UINT nPage; int  nPos; int  nTrackPos;} SCROLLINFO, *LPSCROLLINFO;

cbSize – specifies the size of the SCROLLINFO structure.
fMask – specifies the scroll bar parameters to set or retrieve. This can be a combination of the following values:

 SIF_ALL – Combination of SIF_PAGE, SIF_POS, SIF_RANGE, and SIF_TRACKPOS.
SIF_DISABLENOSCROLL – This value is used only when setting a scroll bar’s parameters. If the scroll bar’s new parameters make the scroll bar unnecessary, disable the scroll bar instead of removing it.
SIF_PAGE – The nPage member contains the page size for a proportional scroll bar.
SIF_POS – The nPos member contains the thumb bar position, which is not updated while the user drags the thumb bar.
SIF_RANGE – The nMin and nMax members contain the minimum and maximum values for the scrolling range.
SIF_TRACKPOS – The nTrackPos member contains the current position of the thumb bar while the user is dragging it.

nMin – minimum scrolling position.
nMax – maximum scrolling position.
nPage – Specifies the page size, in device units. This value to determine the size of the proportional thumb bar.
nPos – Specifies the position of the thumb bar.
nTrackPos – Specifies the current thumb bar position while it is being dragged by the user.

For more detailed information on getscrollinfo-https://docs.microsoft.com/en-us/windows/win32/api/winuser/nf-winuser-getscrollinfo


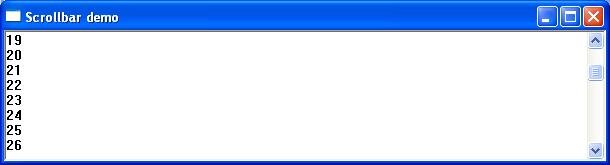
The following short program demonstrates the main window vertical scrollbar by displaying the scroll value within the main window


#include <windows.h>
LRESULT CALLBACK WndProc(HWND, UINT, WPARAM, LPARAM);
int WINAPI WinMain(HINSTANCE hInstance, HINSTANCE hPrevInstance,LPSTR lpCmdLine, int nCmdShow)
{
WNDCLASSEX wc = {0};
MSG msg;
wc.cbSize        = sizeof(WNDCLASSEX);
wc.lpfnWndProc   = WndProc;
wc.hInstance     = hInstance;
wc.hbrBackground = (HBRUSH)(COLOR_WINDOW+1);
wc.lpszClassName = TEXT("myWindowClass");
RegisterClassEx(&wc);
//create window with scrollbar
CreateWindowEx(WS_EX_CLIENTEDGE,TEXT("myWindowClass"),TEXT("Scrollbar demo"),WS_THICKFRAME|WS_OVERLAPPEDWINDOW|  WS_VISIBLE | WS_OVERLAPPEDWINDOW |WS_VSCROLL,CW_USEDEFAULT, CW_USEDEFAULT, 240, 120, NULL, NULL, hInstance, NULL);
while(GetMessage(&msg, NULL, 0, 0) > 0)
{
TranslateMessage(&msg);
DispatchMessage(&msg);
}
return msg.wParam;
}

LRESULT CALLBACK WndProc(HWND hwnd, UINT msg, WPARAM wParam, LPARAM lParam)
{
PAINTSTRUCT Ps;
SCROLLINFO si;    
HDC hdc;
static int yClient;  
int totalwords=100;
static int yPos;
static int rows; 
switch(msg)
{
case WM_PAINT://traps paint message
{
hdc = BeginPaint(hwnd, &Ps);
TCHAR sbv[10]=TEXT("\0");
int count;
int linecount=0;
int startline=GetScrollPos(hwnd,SB_VERT);
int endline=startline+rows;
int strlength=0;
//output line number
for (count=startline; count <endline; count++)
{
strlength=wsprintf(sbv,TEXT("%d"), count+1);
TextOut(hdc,0,linecount,sbv,strlength);
linecount=linecount+15;
}
EndPaint(hwnd, &Ps);
DeleteDC(hdc);
}
break;
//deals with changes in widows sizr
case WM_SIZE: 
yClient = HIWORD (lParam);  // Retrieves the height of the client area. 
rows=yClient/15;//calculate totoal number of text row in client area
SetScrollRange(hwnd, SB_VERT, 0, totalwords-rows, TRUE);//set scrollbar size
InvalidateRect(hwnd,NULL,TRUE) ;//repaint window
break;
case WM_VSCROLL:
{
//Retrieves attributes of scrollbar 
si.cbSize = sizeof (si);
si.fMask  = SIF_ALL;
GetScrollInfo (hwnd, SB_VERT, &si);
//respond to scrollbar messages
switch (LOWORD (wParam))
{
// User clicked the HOME keyboard key.
case SB_TOP:
si.nPos = si.nMin;
break;
// User clicked the END keyboard key.
case SB_BOTTOM:
si.nPos = si.nMax;
break;
// User clicked the top arrow.
case SB_LINEUP:
si.nPos -= 1;
break;
// User clicked the bottom arrow.
case SB_LINEDOWN:
si.nPos += 1;
break;          
// User dragged the scroll box.
case SB_THUMBTRACK:
si.nPos = si.nTrackPos;
break;
default:
break; 
}
// Set the new scollbar position.
si.fMask = SIF_POS;
SetScrollInfo (hwnd, SB_VERT, &si, TRUE);
//redraw window contents by manually sending manually sending WM_PAINT
InvalidateRect(hwnd,NULL,TRUE) ;
}
break;
case WM_CLOSE:
DestroyWindow(hwnd);
break;
case WM_DESTROY:
PostQuitMessage(0);
break;
default:
return DefWindowProc(hwnd, msg, wParam, lParam);
}
return 0;
}