Your browser doesn't support JavaScript api Archives - Page 3 of 3 - Windows Programming

Menus

In Windows, a menu bar is a horizontal bar most often displayed immediately below the caption bar and usually containing a list of drop-down menu items. These drop-down menus can contain either other menu items or nested submenus. Menu items can be enabled, disabled, greyed and checked or not checked.

Menus can be constructed programmatically or built with a resource editor in some IDEs. CreateMenu(), AppendMenu() and InsertMenu() are the primary API function calls when building menus and maintaining menus at run time –

Create a Menu

To create a menu use the CreateMenu() API function. The menu is initially empty. The prototype of this function is

HMENU CreateMenu();

If the function succeeds, the return value is a handle to the newly created menu. If the function fails, the return value is NULL.

Adding a Menu Item

To add items to the top-level menu, drop-down menu, submenu or context menu use the AppendMenu API function. The prototype is –

BOOL AppendMenu(HMENU hMenu,UINT uFlags,UINT_PTR uIDNewItem,LPCSTR lpNewItem);

where
hMenu – A handle to the menu bar, drop-down menu, submenu, or shortcut menu to be changed.
uFlags -Controls the appearance and behaviour of the new menu item.
uIDNewItem – The identifier of the new menu item or, if the uFlags parameter is set to MF_POPUP, a handle to the drop-down menu or submenu.
lpNewItem -The content of the menu item. Can be one of the following: MF_BITMAP; MF_OWNERDRAW; MF_STRING

If the function succeeds, the return value is nonzero. If the function fails, the return value is zero. 

For further detailed reading 
https://docs.microsoft.com/en-us/windows/win32/api/winuser/nf-winuser-appendmenua

Dynamically Modifying Menus

Modify a Menu

The ModifyMenu function changes an existing menu item. The prototype of this function is –

BOOL ModifyMenu(HMENU hMnu,UINT uPosition,UINT uFlags,UINT uIDNewItem,LPCTSTR lpNewItem);

hMnu – Handle to the menu to be changed.
uPosition – Specifies the menu item to be changed, as determined by the uFlags parameter.
uFlags – Specifies flags that control the interpretation of the uPosition parameter and the content, appearance, and behaviour of the menu item.
uIDNewItem – Specifies either the identifier of the modified menu item or the handle to the drop-down menu or submenu.
lpNewItem – Pointer to the content of the changed menu item.

Returns nonzero if the function is successful; otherwise zero.

For further detailed reading
https://docs.microsoft.com/en-us/windows/win32/api/winuser/nf-winuser-modifymenua

Insert a Menu Item

To insert a new menu item at the specified position in a menu use the IntertMenuItem() API function. The prototype is –

BOOL InsertMenuItem(HMENU hmenu,UINT item,BOOL fByPosition,LPCMENUITEMINFOA lpmi);

hMenu – Handle to the menu where the new menu item will be inserted.
uItem – Identifier or position of the menu item before which to insert the new item.
fByPosition – Value specifying the meaning of uItem. If this parameter is FALSE, the uItem parameter is a menu item identifier. Otherwise, it is a menu item position.
lpmii – Pointer to a MENUITEMINFO structure that contains information about the new menu item.

Returns nonzero if the function is successful; otherwise zero.

For further detailed reading.
https://docs.microsoft.com/en-us/windows/win32/api/winuser/nf-winuser-insertmenuitema

Deleting a Menu

Deletes a menu item and the submenu associated with it, if any. The prototype of this function is –

BOOL DeleteMenu(HMENU hMenu,UINT uPosition, UINT uFlags);

Where
hMenu– Handle to the menu to be changed.
uPosition – Specifies the menu item that is to be deleted
nFlags – Is used to interpret nPosition

Returns nonzero if the function is successful; otherwise zero.

Some Useful Menu-Related Messages 


WM_COMMAND – fires when the user selects an active menu item. The value of the LOWORD(wParam) contains the menu item selected.

WM_INITMENU – fires whenever the user clicks anywhere in the menu bar but before the menu becomes active allowing an application to change the menu before an item is chosen. Windows sends the WM_INITMENU message only once per menu activation. The wParam contains a handle to the menu to be initialised.

For further reading https://docs.microsoft.com/en-us/windows/win32/menurc/wm-initmenu

WM_MENUSELECT –  Sent to a menu’s owner window when the user selects a menu item. The low-order word of wParam specifies the menu item or submenu index while the high-order word of wParam specifies one or more menu flags. The lparam contains a handle to the menu that was clicked.

For further reading https://docs.microsoft.com/en-us/windows/win32/menurc/wm-menuselect

WM_INITMENUPOPUP – Sent when a drop-down menu or submenu is about to become active. This allows an application to modify the menu before it is displayed. The wParam is a handle to the drop-down menu or submenu. The low-order lParam word specifies the zero-based relative position of the menu item while the high-order word indicates whether the drop-down menu is the window menu. If the menu is the window menu, this parameter is TRUE; otherwise, it is FALSE.

For further reading https://docs.microsoft.com/en-us/windows/win32/menurc/wm-initmenupopup

The Popup or Context Menu

A popup or context menu generally appears when the user right-clicks. The term context menu refers to the fact that the options in the menu relate to what was right-clicked. The TrackPopupMenu() function displays a context menu in a specific position on the screen. The popup menu can be loaded from an existing resource or created dynamically with a call to CreatePopupMenu.

The prototype for the TrackPopupMenu is –

BOOL TrackPopupMenu(HMENU hMenu,UINT uFlags,int x,int y,int nReserved,HWND hWnd,const RECT *prcRect);

Where
nFlags – Specifies screen-position and mouse-position flags.
Use one of the following flags to specify how the function positions the shortcut menu horizontally.
TPM_CENTERALIGN – Centers the shortcut menu horizontally relative to the coordinate specified by the x parameter.
TPM_LEFTALIGN – Positions the shortcut menu so its left side is aligned with the coordinate specified by the x parameter.
TPM_RIGHTALIGN – Positions the shortcut menu so its right side is aligned with the coordinate specified by the x parameter.
Use one of the following flags to specify how the function positions the shortcut menu vertically.
TPM_BOTTOMALIGN – Positions the shortcut menu so its bottom side is aligned with the coordinate specified by the y parameter.
TPM_TOPALIGN – Positions the shortcut menu so its top side is aligned with the coordinate specified by the y parameter.
TPM_VCENTERALIGN – Centers the shortcut menu vertically relative to the coordinate specified by the y parameter.
x – Specifies the horizontal position in screen coordinates of the pop-up menu.
y – Specifies the vertical position in screen coordinates of the top of the menu on the screen.
pWnd – Identifies the window that owns the pop-up menu.
lpRect – Ignored.

Returns the result of calling TrackPopupMenu

Example

The code section below creates a window with a top-level menu, a single drop-down menu and two selectable menu items. In addition, the same menu options are available via a “right-click” context menu. Selecting either will produce a message beep.

Working with the Mouse

Windows can handle a mouse with up to 3 buttons and a mouse wheel. Windows generates mouse messages when the user moves the mouse, presses the mouse buttons or scrolls the mouse wheel, within the client and non-client area. The non-client area of a window consists of borders, a title bar, a menu bar, a minimize/maximize button and an exit button. 

Some Common Client Area Mouse Messages

WM_MOUSEMOVE- Generated when the mouse moves over the client area of a window.
WM_LBUTTONDBLCLK – Left mouse button pressed twice within the double-click time.
WM_LBUTTONDOWN- Left mouse button pressed.
WM_LBUTTONUP – Left mouse button released.
WM_RBUTTONDBLCLK – Right mouse button pressed twice within the double-click time
WM_RBUTTONDOWN – Right mouse button pressed.
WM_RBUTTONUP – Right mouse button released.
WM_MBUTTONDBLCLK – Middle mouse button clicked twice within the double-click time.
WM_MBUTTONDOWN – Middle mouse button pressed.
WM_MBUTTONUP – Middle mouse button released.
WM_SETCURSOR – The mouse cursor needs to change.

When an application receives a mouse message, the lParam value contains the cursor’s x, y position. These coordinates are relative to the upper-left corner of the client area.  To retrieve these x and y values, the most common method is to use the GET_X_LPARAM and GET_Y_LPARAM  macros :

xPos = GET_X_LPARAM(lParam); yPos = GET_Y_LPARAM(lParam);

The value of wParam contains information about the state of the mouse and keyboard. It may contain any combination of the following values –

MK_LBUTTON – Posted when the user presses the left mouse button
MK_MBUTTON – Posted when the user presses the middle mouse button
MK_RBUTTON – Posted when the user presses the right mouse button
MK_SHIFT – Posted when the user presses the shift button
MK_CONTROL – Posted when the user presses the control button
MK_XBUTTON1 – Posted when the user releases the first or second X button

Example

The following program demonstrates mouse and keyboard messages by responding to mouse clicks and displaying the relevant status information at the associated mouse click position on the screen.


Some Common Non-Client Area Mouse Messages

WM_NCLBUTTONDOWN – Left mouse button pressed.
WM_NCLBUTTONUP – Left mouse button released.
WM_NCLBUTTONDBLCLK – Left mouse button clicked twice within the double-click time
WM_NCMBUTTONDOWN – Middle mouse button pressed.
WM_NCMBUTTONUP – Middle mouse button released.
WM_NCMBUTTONDBLCLK – Middle mouse button clicked twice within the double-click time
WM_NCRBUTTONDOWN – Right mouse button pressed.
WM_NCRBUTTONUP – Right mouse button released.
WM_NCRBUTTONDBLCLK – Right mouse button clicked twice within the double-click time
WM_NCMOUSEMOVE – Generated when the mouse moved over the non-client area of a window
WM_NCHITTEST – Tests what type of object the cursor is over (border, caption, client area, etc.)

The lParam value contains the screen position information. The x and y coordinates of the cursor are stored using the POINTS structure.  These coordinates are relative to the upper-left corner of the screen. Screen coordinates can be converted to client coordinates using the API function ScreenToClient().

Detecting the Non-Client Area with WM_NCHITTEST 

The WM_NCHITTEST message can be used to test what type of object the cursor is over (border, caption, client area, etc.)  The return value of the DefWindowProc function is used to identify where in the window’s nonclient area the event occurred – 

case WM_NCHITTEST: hittest = DefWindowProc(hwnd, message, wParam, lParam); if(HTCLIENT == hittest) { }

A selection of these return codes is shown in the table below. 

HTCAPTION – The title bar.
HTCLOSE- The close button.
HTGROWBOX – The restore button (same as HTSIZE).
HTHSCROLL -The window’s horizontal scroll bar.
HTMENU – The menu bar.
HTREDUCE – The minimize button.
HTSIZE – The restore button (same as HTGROWBOX).
HTSYSMENU – The system menu box.
HTVSCROLL -The window’s vertical scroll bar.
HTZOOM -The maximize button

Example

The following short program demonstrates non-client area messages by responding to mouse clicks within the non-client area. Clicking in the title bar, the restore button, the close button, the maximise button, the Windows border or the system menu will output a relevant message within the client area. To close the window double-click anywhere within the non-client area


The Mouse Wheel

The WM_MOUSEWHEEL message is sent when the mouse wheel is rotated. The lParam value contains the cursor’s x and y positions. These coordinates are relative to the upper-left corner of the client screen. The high-order wParam value indicates the distance the wheel is rotated in multiples of 120 with a negative value indicating a backward rotation and a positive value indicating a forward rotation. The low order wparam value indicates various virtual key states.

fwKeys = LOWORD(wParam); // key flag
szDelta = (short) HIWORD(wParam); // wheel rotation
xPos = (short) LOWORD(lParam); // horizontal position of pointer
yPos = (short) HIWORD(lParam); // vertical position of pointer

Capturing the Mouse

A window procedure normally receives mouse messages only when the mouse cursor is positioned over the client or non-client area of the window however a program might need to receive mouse messages when the mouse is outside the window. For example, if a mouse button is clicked inside a window but the mouse moves outside the window’s client area before releasing that button, the window will not receive the button-up event. To remedy this problem, windows allows the application to ‘capture’ the mouse and continue to receive mouse messages when a cursor moves outside the application window. Windows will then continue to receive messages until the button is released or the capture is cancelled. The mouse is captured with the API function SetCapture() and released with ReleaseCapture(). These functions are normally executed in the button-down and button-up handlers

Changing the Mouse Icon

The API function SetCursor allows an application to change the mouse cursor. The syntax for this function is

HCURSOR SetCursor(HCURSOR hCursor);

Where hCursor is a handle to the cursor. The cursor can be created by the CreateCursor() function or loaded by the LoadCursor() or LoadImage() function. If this parameter is NULL, the cursor is removed from the screen.
The return value is the handle to the previous cursor or NULL if there was no previous cursor.

Double Clicks

For a window to register a double click, the window must be set up to be notified of a double click event by setting the style member in the Windows class declaration must be set to CS_DBLCICKS –

wndclass.style=CS_DBLCLKS;

The left and right button double-click messages are WM_LBUTTONDBLCLK and WM_RBUTTONDBLCLK. The contents of the lParam and wParam are the same as for a single click. To set the double click interval use the API function SetDoubleClickTime(UINT interval) and to obtain the double click interval use the function GetDoubleClickTime().

Keyboard Input

Windows receives keyboard input in the form of messages.  A physical key press can generate both a keystroke message and a character. Keystrokes represent the physical keypress and characters represent the display symbol or glyphs generated as a result of the keypress. Not every keystroke will generate a character.

Each time a key is pressed a message is sent to the window with input focus. Input focus indicates the component of the graphical user interface that is selected to receive input. Since most applications will have more than one window, a particular window must have input focus to receive these messages. The window that has the input focus receives all keyboard messages until the focus changes to a different window.

Keystroke Messages

When a key is pressed, a WM_KEYDOWN or WM_SYSKEYDOWN message is placed in the message queue by Windows, and when that key is released Windows places either a WM_KEYUP or WM_SYSKEYUP message in the message queue. These keystroke messages indicate the pressed key using a virtual key code. The virtual key code is a device-independent integer code that uniquely identifies a key on the keyboard. This virtual key code is stored in the wParam parameter of the message. The lParam parameter contains other useful information about the keystroke including repeat count and key transition states i.e. if the key is being pressed or released. For a full list of virtual key codes keyboards and symbolic constant names https://learn.microsoft.com/en-us/windows/win32/inputdev/virtual-key-codes

The WM_SYSKEYDOWN and WM_SYSKEYUP message is generated when the user presses the F10 key (menu bar) or holds down the ALT key and then presses another key. It also occurs when no window currently has the keyboard input focus with the message sent to the active window.

The WM_SYSKEYDOWN and  WM_SYSKEYUP messages are usually processed by the Windows system and not by Windows applications. Since improperly handling system keystroke messages can result in unpredictable behaviour the WM_KEYDOWN and WM_KEYUP are the mouse messages of most interest to the developer.

Character Messages

Character messages are the result of translating keystroke messages into character codes. The most commonly used character message is WM_CHAR. When the WM_CHAR message is sent, the wparam parameter contains the character code of the key pressed and the lparam parameter contains other information such as the repeat count, extended key flag, and transition state.  An application must include the TranslateMessage function in its message loop to retrieve character codes.

Dead Keys

A dead key is a modifier key that does not generate a character but modifies the character generated by the key pressed immediately after it. Dead keys are typically used to attach a specific diacritic to a base letter.

An application will need a WM_DEADCHAR or WM_SYSDEADCHAR message map handler to process dead-key messages.

Retrieving a Key State

The GetKeyState() API function retrieves the status of a specified virtual key. The status specifies whether the key is up, down, or toggled. Since information about the current states of keys such as Shift and Ctrl keys is not included in keyboard messages, the GetKeyState() API function allows the developer to determine these key states before deciding on a course of action. The syntax for this function is –

SHORT GetAsyncKeyState(int vKey);

vKey – Specifies one of 256 possible virtual-key codes.

If the function succeeds, the return value indicates whether the key was pressed since the last call to GetAsyncKeyState, and whether the key is currently up or down.

Example

The following code segment demonstrates the WM_KEYDOWN AND WM_CHAR message by printing the virtual key code and the associated character to the screen. If no character is associated with the keycode the 2nd line is left blank.

The Device Context

A device context is a Windows data structure containing information about the drawing attributes of an output device. When an application needs to send data to a screen or printer it must first obtain a handle to a device context or DC of that device. Windows then fills the device context structure with the attribute values of the device being written to. The relevant API function can then use the information in the device context to display output as required. The process of writing to the screen is known as ‘painting’.

A window might need to be ‘painted’ or ‘repainted’ when the window is first created, when it is uncovered from behind another window, or as the result of some action by the user. Usually, an application will only be responsible for painting the client area. The client area is the rectangular part of a window inside the window’s border that doesn’t include the window frame, caption, menu, system menu, or scrollbars. The operating system automatically paints the surrounding frame, including the title bar.

System Generated Repaint Requests

Windows does not keep a record of the application window content. If any part of the client area is overwritten, Windows will notify the application by sending a WM_PAINT message to the application window indicating that the client area needs to be ‘repainted’. The region of the application client that needs updating is known as an ‘invalid area’. Windows maintains the size and coordinates of this region for each window.

BeginPaint()

The WM_PAINT message is used with the BeginPaint() function to obtain a device context. It prepares the specified window for painting and fills a PAINTSTRUCT structure with information about the invalidated area which will exclude the area outside the update region. The application can then use these values to redraw the window starting with the window’s background which is repainted with the current brush selected in the device context.

Windows continues sending WM_PAINT messages to the message queue if there is an invalidated area. The EndPaint() function must be called after BeginPaint to validate the client area before leaving the WM_PAINT handler block. Failure to validate the client area results in an endless WM_PAINT loop. The EndPaint marks the end of the screen validation and releases the display device context.

The prototype of the BeginPaint function is as follows-

HDC BeginPaint(HWND hwnd,LPPAINTSTRUCT lpPaint);

Where
hwnd is the handle of the window for which the device context is being obtained
lpPaint is a pointer to a PAINTSTRUCT structure.

If the function is successful, its return value is the device context. If it fails, the return value is NULL.

The prototype of PAINTSTRUCT is as follows –

typedef struct tagPAINTSTRUCT {HDC hdc;BOOL fErase;RECT rcPaint;BOOL fRestore; BOOL fIncUpdate;BYTE rgbReserved[16];} PAINTSTRUCT;

Only 3 parameters are available to the user application, the rest are filled in by windows when the user application calls BeginPaint. The hdc field is the handle to the device context returned from BeginPaint, fErase specifies whether the background needs to be redrawn and rcPaint specifies the upper left and lower right corners of the rectangle in which the ‘painting’ is requested.

The EndPaint() function is required for each call to the BeginPaint function to validate the client after the screen ‘painting’ is complete. It has the following syntax

BOOL EndPaint(HWND hwnd, const PAINTSTRUCT *lpPaint);

Where hwnd is the Handle to the window that has been ‘repainted’ and lpPaint is a Pointer to a PAINTSTRUCT structure. The return value is always nonzero.

Other Device Context-Related API Functions

GetDC()

The GetDC() function retrieves a handle to a display device context for the client area of a specified window or the entire screen. GetDC is usually called when an application needs to ‘repaint’ the screen instantly. It occurs in response to an action by the user that does not generate a WM_Paint message. The GetDC method ‘paints’ the Windows client area and not merely the invalid region. The prototype for this function is:

HDC GetDC(HWND hWnd);

Where hWnd is a handle to the required Windows device context. If this value is NULL, GetDC retrieves the device context for the entire screen. If the function succeeds, the return value is a handle to the DC for the required window’s client area. If the function fails, the return value is NULL.

GetWindowDC()

Similar to the GetDC function the GetWindowDC() function retrieves the device context (DC) for the entire application window, including non-client areas such as the title and scroll bars. Since the origin of the device context will be the upper-left corner of the window instead of the client area the application will be able to paint anywhere in the application window. The prototype for this function is:

HDC GetWindowDC(HWND hWnd);

Where hWnd is a handle to the required Windows device context. If this value is NULL, GetWindowDC retrieves the device context for the entire screen. If the function succeeds, the return value is a handle to the DC for the required window’s client area. If the function fails, the return value is NULL.

ReleaseDC()

Releases a device context (DC), freeing it for use by other applications after a call to GetDC or GetWindowsDC. The prototype is

int ReleaseDC(HWND hWnd,HDC hdc);

Where hWnd is a handle to the window whose DC is to be released and hdc is the device context to be released. The return value indicates whether the DC was released with a value of 1 indicating success and a value of zero indicating failure.

ValidateRect()

Allows an application to validate a Windows region manually. The prototype for this function is

BOOL ValidateRect(HWND hWnd,const RECT *lpRect);

Where
hWnd is a handle to the window.
lpRect is a pointer to a RECT structure that contains the client coordinates of the rectangle to be removed from the update region. If the hWnd parameter is NULL the system invalidates and ‘redraws’ the entire window. If the RECT structure is NULL the entire client area is removed from the update rectangle. If the function is successful, the return value is nonzero.
If the function fails, the return value is zero.

InvalidateRect()

Allows an application to invalidate a Windows region manually and tells Windows to ‘repaint’ that region.

The prototype for this function is

BOOL InvalidateRect(HWND hWnd,const RECT *lpRect,BOOL bErase);

where
hWnd – is a handle to the window that needs to be updated. If this parameter is NULL, the system invalidates and redraws all windows, not just the windows for this application.
lpRect – is a pointer to a RECT structure containing the client coordinates of the update region. If the parameter is NULL, the entire client area is set for update.
bErase – specifies whether the background within the update region is to be erased when the update region is processed. If this parameter is TRUE, the background is erased when the BeginPaint function is called. If this parameter is FALSE, the background remains unchanged.

If the function is successful then the return value is nonzero. If the function fails, the return value is zero.

SaveDC and RestoreDC.

Each time an application requests a device context its attributes are reset to the system default and the default pen and brush will be used. To avoid this reinitialisaton, the current device context state can be saved with the API function SaveDC() and restored with the API function RestoreDC().

Example

The following program demonstrates the WM_PAINT message by keeping a running total of client area repaints. Dragging another window over the application window or clicking the minimise and maximise icons can generate a repaint request.

Common Elements

WinMain

All Windows programs begin execution with a call to WinMain().  Winmain is the Windows equivalent of the C function main() and marks the initial entry point for any Win32-based application. WinMain contains the code to initialise and register the Windows application, display its main window, and enter a message retrieval-and-dispatch loop.

The prototype of this function is as follows

int WINAPI WinMain(HINSTANCE hInstance, HINSTANCE hPrevInstance, PWSTR pCmdLine, int nCmdShow);

The four parameters are:

hInstance – handle to the current instance of the application. The operating system uses this value to identify the executable (EXE) when loaded in memory.

hPrevInstance – used in 16-bit applications to provide a handle to the previous application instance. For a Win32-based application, this parameter is always NULL and has no meaning.

pCmdLine – is a pointer to a null-terminated string used to pass command line parameters to Windows programs.

nCmdShow – is a flag that says whether the main application window will be minimised, maximised, or shown normally.

The function returns an int value. Although the operating system does not utilise this value, it can convey a status code to another program.

Defining and Registering the Windows Class

The Windows class structure WNDCLASSEX contains information relating to the behaviour and looks of a window. The syntax of the WNDCLASSEX structure is as follows

typedef struct _WNDCLASSEX { UINT cbSize; // size of this structure UINT style; // style flags (see below) WNDPROC lpfnWndProc; // function pointer to the windows callback procedure int cbClsExtra; // extra window-class info (usually 0) int cbWndExtra; // extra window info (usually 0) HANDLE hInstance; // the instance of the application HICON hIcon; // the main icon that will represent the application HCURSOR hCursor; // the cursor for the window HBRUSH hbrBackground; // the background brush to paint the window LPCTSTR lpszMenuName; // the name of the menu to attach if any LPCTSTR lpszClassName; // the name of the registered class itself HICON hIconSm; // the handle of the small icon } WNDCLASSEX;

style – Specifies the class style(s). Styles can be combined by using the bitwise OR (|) operator. The style can be any combination of the following:  CS_BYTEALIGNCLIENT, CS_BYTEALIGNWINDOW, CS_CLASSDC, CS_DBLCLKS, CS_GLOBALCLASS, CS_HREDRAW, CS_NOCLOSE, CS_OWNDC, CS_PARENTDC, CS_SAVEBITS, CS_VREDRAW. 

RegisterClassEx – Before a window can be displayed on the screen it must be registered. RegisterClassEx() accepts a single parameter with the address of the WNDCLASS struct. The registered class name is later called in the CreatWindowsEx function.

In addition to the WNDCLASSEX structure, a window can be registered with the depreciated WNDCLASS structure and the associated RegisterClass function. The main difference between the two is the inclusion of a size parameter and a parameter to specify the handle to a small icon for the window.

For a more detailed explanation of these styles and options use the following resource.
https://docs.microsoft.com/en-us/windows/win32/api/winuser/ns-winuser-wndclassexw

Windows also offers a standard selection of predefined child window classes which can be used to implement the functionality of common controls.

CreateWindow

A Window is created by a call to the CreateWindowEx() or CreateWindow() function.  CreateWindowEx differs from CreateWindow in that it offers an extended window style. The prototype for this function is 

HWND CreateWindowEx( DWORD dwExStyle, LPCTSTR lpClassName, LPCTSTR lpWindowName, DWORD dwStyle, int x, int y, int nWidth, int nHeight, HWND hwndParent, HMENU hmenu, HANDLE hinst, LPVOID lpvParam )

The parameter description is as follows –  

DWORD dwExStyle – defines extended window style. For an in-depth description of extended styles –https://docs.microsoft.com/en-gb/windows/win32/winmsg/extended-window-styles
LPCTSTR lpClassName –pointer to a null-terminated string containing the predefined control-class names.  The class name can be created with RegisterClass or one of the predefined classes used to create child controls.
LPCTSTR lpWindowName – pointer to a null-terminated string that specifies the window name.
DWORD dwStyle –  indicates the style of windows that will be created.  The style is made up of values that are combined together with the | operator. For a full list of styles – https://docs.microsoft.com/en-gb/windows/win32/winmsg/window-styles
int x – horizontal position of the window.
int y – vertical position of the window.
int nWidth – window width.
int nHeight – window height.
HWND hwndparent – handle to parent or owner window.  A NULL value is used if there is no parent window.
HMENU hmenu – menu handle or child identifier.
HINSTANCE hInst- handle to the application instance.
LPVOID lpvParam – window creation data.

The function returns a handle to the new window or NULL if it fails.

Message Loop

A Windows program is event-driven. This means that program flow will be determined by an almost non-stop stream of notifications from various events generated by the system or users such as a keypress, mouse click, or an application change. Each of these events will be converted into a message. Windows creates a message queue for every running application. The application, in turn, includes a small message loop to retrieve these queued messages and then dispatches them back to the window. Windows by way of a message handler then identifies and calls the correct Windows procedure Wndproc() with the message as one of the parameters. Each time the application is ready to read a message, it must call the API function GetMessage(). The prototype for the GetMessage function is

BOOL GetMessage( LPMSG lpMsg, // point to MSG structure containing message information HWND hWnd, // specifies for which window messages will be obtained. To receive all messages directed at the application this value must be null. UINT wMsgFilterMin, // first message UINT wMsgFilterMax // last message );

Inside the message loop, there are two functions

Translate message() – This Windows API call translates virtual key codes into messages.
Dispatch message() – Dispatches message back to windows.

What is a Message?

All messages are 16-bit integers of structure type MSG and have the following format –

typedef struct tagMSG{ HWND hwnd;//Identifies the window whose window procedure receives the message. UINT message;//Specifies the message number. WPARAM wParam;//Specifies additional information about the message. LPARAM lParam;//Specifies additional information about the message. DWORD time; //Specifies the time at which the message was posted. POINT pt; //Specifies screen coordinates of cursor, when the message was posted. } MSG;

SendMessage Function

The SendMessage() API function used throughout the examples on this site, allows specified messages to be sent to a window by calling the windows procedure for the specified window. The prototype for the SendMessage function is –

LRESULT SendMessage(HWND hWnd,UINT Msg,WPARAM wParam,LPARAM lParam);

where
hWnd – is a handle to the window whose window procedure will receive the message. If this parameter is type HWND_BROADCAST, the message will be sent to all top-level windows in the system, including any windows that have been disabled or are invisible.
Msg – The message to be sent. For a full list and description of system-provided messages –
https://docs.microsoft.com/en-gb/windows/win32/winmsg/about-messages-and-message-queues .
WParam – holds additional message-specific information.
LParam – holds additional message-specific information.

The return value specifies the result of the message processing and will depend on the message sent.

Windows Procedure

The Windows procedure or WndProc(), is used by a Windows application to process messages until the application is terminated.  Each application window must have a WndProc declared as returning type LRESULT CALLBACK. In Windows, a callback function is used to describe any function that is called by the operating system.  Although the system produces hundreds of different messages, an application will typically need to filter out and process only a small fraction of these messages. In our simple window, WndProc returns type DefWindowProc to ensure default processing for messages that the application does not act on. 

The prototype of WndProc is.

LRESULT CALLBACK WindowProc(HWND hwnd,  UINT uMsg,WPARAM wParam, LPARAM lParam );

The four Parameters are-

hwnd – is a handle to the window to which the message was sent.
uMsg – specifies the message.
wParam – specifies additional message information.
lParam -specifies additional message information.

Creating a Simple Window

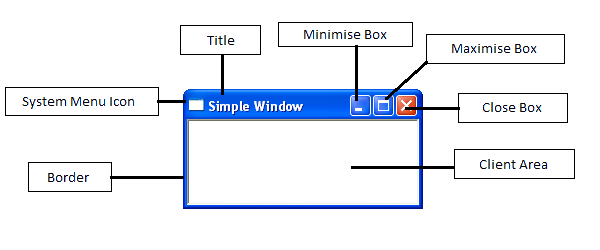
The simple Windows program below creates a basic window with a system menu icon, a minimise, maximise and a close box. It can be compiled in either C or C++.

A simple window In API


#include <windows.h>
LRESULT CALLBACK WndProc(HWND, UINT, WPARAM, LPARAM);
int WINAPI WinMain(HINSTANCE hInstance, HINSTANCE hPrevInstance,LPSTR lpCmdLine, int nCmdShow)
{
WNDCLASSEX wc;
MSG msg;

//Registering the Window Class
wc.cbSize        = sizeof(WNDCLASSEX);
wc.style         = 0;
wc.lpfnWndProc   = WndProc;
wc.cbClsExtra    = 0;
wc.cbWndExtra    = 0;
wc.hInstance     = hInstance;
wc.hIcon         = LoadIcon(NULL, IDI_APPLICATION);
wc.hCursor       = LoadCursor(NULL, IDC_ARROW);
wc.hbrBackground = (HBRUSH)(COLOR_WINDOW+1);
wc.lpszMenuName  = NULL;
wc.lpszClassName = TEXT("myWindowClass");
wc.hIconSm       = LoadIcon(NULL, IDI_APPLICATION);
RegisterClassEx(&wc);

//Creating the Window
CreateWindowEx(WS_EX_CLIENTEDGE,TEXT("myWindowClass"),TEXT("Simple Window"), WS_VISIBLE | WS_OVERLAPPEDWINDOW,CW_USEDEFAULT, CW_USEDEFAULT, 240, 120, NULL, NULL, hInstance, NULL);

//The Message Loop
while(GetMessage(&msg, NULL, 0, 0) > 0)
{
TranslateMessage(&msg);
DispatchMessage(&msg);
}
return msg.wParam;
}

//WndProc procedure. Application acts on messages
LRESULT CALLBACK WndProc(HWND hwnd, UINT msg, WPARAM wParam, LPARAM lParam)
{
switch(msg)
{
case WM_CLOSE:
DestroyWindow(hwnd);
break;
case WM_DESTROY:
PostQuitMessage(0);
break;
default:
return DefWindowProc(hwnd, msg, wParam, lParam);
}
return 0;
} 

Line 1 – All Windows programs must include the header file <windows.h>. This contains declarations for all of the functions in the Windows API, all the common macros used by Windows programmers, and all the data types used by the various functions and subsystems.
Line 2 – Function declaration for CALLBACK function WndProc().
Line 3 – WinMain() function. Marks the program entry point.
Line 5 – Declares the wc structure variable that defines the Window’s class.
Line 6 – Declares the msg structure variable for holding Windows messages.
Lines 9 to 20 – Defines the Window’s class
Line 21 – Registers the Windows class using the function RegisterClassEx().
Line 24 – Once a Window has been defined and registered it is created using the API function CreateWindowEx().
Lines 27 to 33 – The final part of WinMain is the message loop. The purpose of the message loop is to receive and process messages sent from Windows. Once the message loop terminates the value of msg.wParam is returned to Windows.
Line 36 to 50 – The WndProc() procedure is used by Windows to pass messages to an application. In this instance, only the WM_DESTROY & WM_CLOSE message is explicitly processed.

Overview

The Windows API (application programming interface) is used in developing desktop and server applications and is commonly referred to as Win32. The Win32 interface comprises an extensive collection of system-defined functions and other programming elements that provide access to the operating system. These API functions are contained in Dynamic Link Libraries (DLLs) which a program must access when executed. All Windows programs must interact with the Windows API, regardless of the language. The API is programmed in either C or C++. The Win32 API is the platform of choice for GUI applications that need the highest level of performance and direct access to system hardware.

The Microsoft Foundation Class (MFC) library consists of a hierarchical tree of classes, functions, data types, and constants to simplify the creation of applications for Microsoft Windows.

MFC was introduced in 1992 and developed to simplify the process of developing Windows applications. The MFC library sits on top of or wraps portions of the Windows API in C++ classes, meaning direct Windows API calls are rarely needed. Developers can create objects from these MFC classes and call member functions belonging to those objects. The main advantage of this approach is the ease and speed of application development by providing pre-written code. MFC also offers all the benefits associated with programming in C++.

.NET Framework is a more recent software framework developed by Microsoft for creating Windows applications. It comprises an extensive class library but, in contrast to MFC, supports various programming languages such as Visual Basic and C#. Programs written for the .NET Framework are executed in a virtual software environment (in contrast to a hardware environment) known as the Common Language Runtime (CLR). The CLR provides managed execution, transforming source code into byte code known as Common Intermediate Language (CIL), and performs garbage collection and memory management. In addition to the language interoperability, applications built on the .Net framework will work on any Windows platform.

Although the Windows API is built around the C language, it can be utilised by any language or compiler that can handle the low-level data structures along with associated calling conventions for calls and callbacks.

Compiler support: The Windows Software Development Kit (SDK) provides the tools, compilers, headers, and libraries that a developer needs to create applications that will run on Microsoft Windows. To develop software that can access the Windows API, a compiler must be able to utilise Microsoft-specific libraries. Besides Microsoft Visual Studio, the following compilers can all be used to develop software that uses the Windows API:

Watcom
Pellesc
MinGW-32/64
LCC
Cygwin

email

Alternative sites for the javascript-phobic

https://joomla.cybernaught.net